


Product development involves many moving parts. Teams often struggle to see the big picture when dealing with hundreds of requirements. This is where user story mapping becomes essential. It transforms a flat list of tasks into a visual, navigable structure. This guide explores how to build these maps effectively without relying on specific tools or hype.
Understanding the flow of user interaction is critical for building software that solves real problems. A flat backlog often hides dependencies and context. By arranging stories horizontally and vertically, teams create a narrative. This narrative guides development from the first release to the final product. Below, we break down the mechanics, benefits, and execution of this technique.
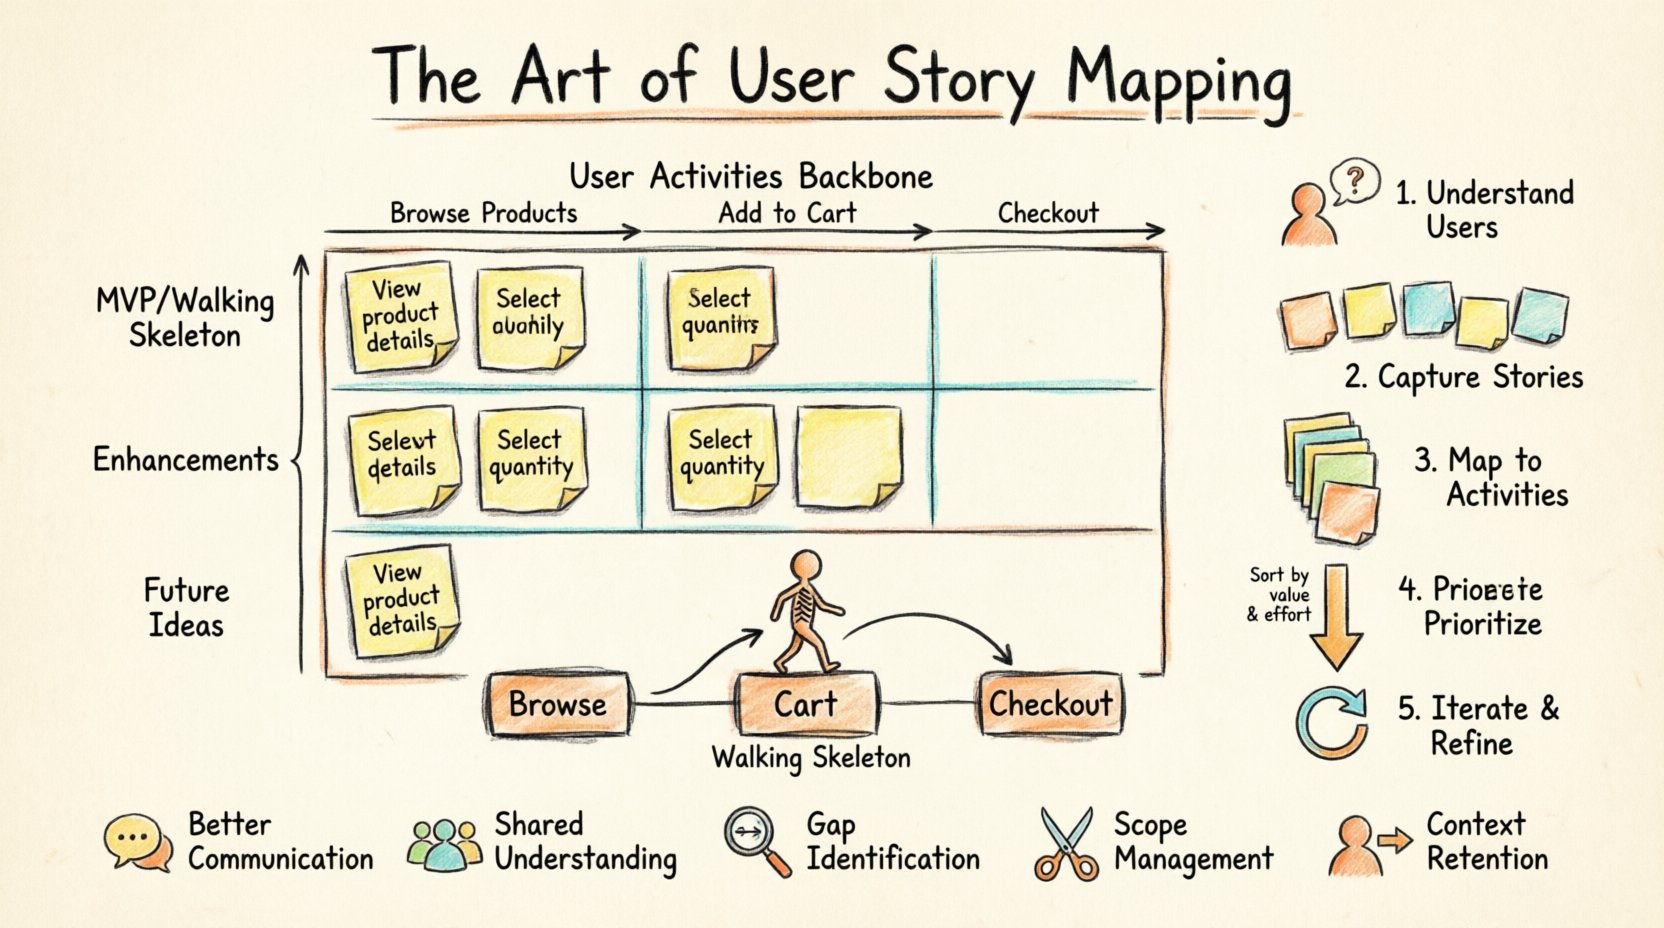
🤔 What Is User Story Mapping?
User story mapping is a collaborative technique used to visualize the journey of a user through a product. It was popularized by Jeff Patton to help Agile teams organize work. Instead of viewing items as isolated tickets, this method groups them into a coherent story.
The map typically consists of a horizontal axis and a vertical axis.
- Horizontal Axis: Represents the flow of activities a user performs. This is often called the “backbone” or “spine”.
- Vertical Axis: Represents the priority of those activities. High-level stories sit at the top, with more detailed tasks underneath.
This structure allows stakeholders to see the entire user experience at a glance. It helps identify gaps in the flow and ensures that no critical step is missed during planning.
🧩 The Anatomy of a Map
To create an effective map, you must understand the hierarchy of information. Each level serves a specific purpose in defining the scope and detail of the work.
1. User Activities (The Backbone)
These are the high-level actions a user takes to achieve a goal. They span across the top of the map. Examples include “Browse Products,” “Add to Cart,” and “Checkout.” These activities remain relatively stable even as the underlying details change.
2. User Stories (The Steps)
Under each activity, you list the specific stories required to complete that activity. These are granular steps. For “Add to Cart,” a story might be “View product details.” Another might be “Select quantity.” These sit below the activity.
3. Tasks (The Implementation)
At the bottom, you may find technical tasks or specific UI interactions required to build the story. These are the most granular level. They help developers understand what needs to be built.
| Level | Focus | Question Answered |
|---|---|---|
| Activity | High-Level Goal | What is the user doing? |
| Story | Specific Action | How do they do it? |
| Task | Technical Detail | What code is needed? |
🛠️ Step-by-Step Process for Creating a Map
Building a map is a workshop activity. It requires collaboration between product managers, designers, and developers. Here is how to execute the process effectively.
Step 1: Define the User Persona
Before writing a single story, identify who the user is. Different users have different needs. A map for a new customer differs from one for a returning subscriber. Define the primary persona you are designing for to keep the focus sharp.
- Who is the main user?
- What is their primary goal?
- What environment are they using the product in?
Step 2: Identify the Main Activities
Write down the major steps the user takes. Use sticky notes or digital equivalents. Place them horizontally across the board. Do not worry about order yet. Just capture the flow of actions.
- Start with the entry point.
- End with the final outcome or exit.
- Keep the language simple and action-oriented.
Step 3: Flesh Out the Stories
Under each activity, add the specific stories. These should be short phrases. If a story is too large, split it. Ensure every story adds value to the activity. If a story does not fit under an activity, it might belong to a different category.
Step 4: Prioritize Vertically
This is the most critical step. Arrange the stories from top to bottom based on priority. The top row represents the “Walking Skeleton” or Minimum Viable Product (MVP). The stories below represent enhancements and future releases.
- Top Row: Essential features for launch.
- Second Row: Important but not critical.
- Lower Rows: Nice-to-have features.
Step 5: Review and Iterate
A map is never static. As you learn more about the user, the map changes. Regularly review the map with the team. Remove outdated items and add new discoveries. Treat it as a living document.
📊 Prioritization Strategies
Once the map is built, you need to decide what to build first. Prioritization ensures you deliver value early. There are several ways to slice this map.
1. The Walking Skeleton
This involves taking one story from each activity in the top row. It creates a minimal end-to-end flow. Even if the features are basic, they connect. This allows you to test the full system early.
2. Vertical Slicing
Instead of building all features for one activity, build a slice that includes activities. This ensures you deliver a complete feature set that works together. It reduces the risk of having disconnected features.
3. Horizontal Slicing
Build all stories for one activity before moving to the next. This is useful when an activity depends heavily on itself. However, this can delay value delivery for other areas.
🚀 Benefits of Visualization
Why go through the effort of mapping? The benefits extend beyond simple organization.
- Better Communication: Visuals are easier to understand than long documents. Stakeholders can see the plan immediately.
- Shared Understanding: Everyone sees the same picture. Developers, designers, and business owners align on the goal.
- Gap Identification: You can spot missing steps in the user journey that a flat list hides.
- Scope Management: It is easier to cut scope by removing rows rather than deleting individual tickets.
- Context Retention: New team members can understand the product history and future plans quickly.
🧱 Common Challenges and Solutions
Teams often face obstacles when implementing this technique. Knowing what to expect helps you navigate these hurdles.
Challenge 1: Too Much Detail Too Soon
Teams sometimes fill the map with every possible detail. This makes the map cluttered and unusable.
- Solution: Stick to the top-down approach. Define activities first. Only add detail to the top rows. Leave lower rows vague until needed.
Challenge 2: Ignoring the User
Maps can become feature lists instead of user journeys. The focus shifts to “what we build” rather than “what the user does”.
- Solution: Constantly refer back to the persona. Ask, “Does this story help the user achieve their goal?”
Challenge 3: Lack of Collaboration
If only one person builds the map, it lacks the collective intelligence of the team.
- Solution: Run workshops. Invite developers and designers to place the notes themselves. Facilitate discussion rather than dictating the layout.
🔄 Maintaining the Map
A map created once is useless if it sits on a shelf. It must be integrated into the workflow.
Link to Sprint Planning
Use the top row of the map to plan sprints. Select stories from the map to fill the sprint backlog. This keeps the sprint work aligned with the long-term vision.
Update After Releases
After a release, move completed stories to a “Done” section or archive them. Add new ideas that emerged during the cycle. This keeps the roadmap current.
Track Progress
Visual indicators help. Use markers to show which stories are in progress, completed, or blocked. This provides immediate feedback on project health.
📝 Integrating with Agile Practices
User story mapping fits naturally into Agile frameworks. It complements other practices without replacing them.
- Backlog Refinement: Use the map to groom the backlog. Break down large stories during refinement sessions.
- Retrospectives: Review the map to see if the team is delivering the right features. Discuss if priorities need to shift.
- Release Planning: Use the vertical slices to plan releases. Decide which rows constitute a launch.
🌟 Real-World Application Example
Consider an e-commerce platform. The map would look different for a buyer versus a seller. Let’s look at the buyer journey.
Activity: Search for Item
- Enter search term
- View search results
- Filter results by category
- Sort results by price
Activity: View Product
- See product image
- Read description
- View reviews
- Check stock availability
Activity: Purchase Item
- Add to cart
- Enter shipping info
- Select payment method
- Confirm order
By visualizing this, the team realizes that “Check stock availability” is critical for the “Purchase Item” activity. If this is missing, the purchase flow breaks. This insight might be missed in a flat list of tickets.
🎯 Measuring Success
How do you know if the mapping is working? Look for these indicators.
- Reduced Rework: Fewer changes requested because the flow was validated early.
- Faster Onboarding: New team members understand the product faster.
- Better Velocity: Teams plan more accurately because dependencies are visible.
- Higher Satisfaction: Users find what they need because the journey is logical.
🛑 What to Avoid
There are pitfalls that can derail the process. Stay away from these common mistakes.
- Perfectionism: Do not try to make the map perfect immediately. Get the structure right, then refine.
- Tool Dependency: Do not focus on the software used. Focus on the conversation and the content.
- Ignoring Technical Debt: Ensure technical tasks are represented. A map with only features will fail to account for maintenance.
- Static Planning: Do not treat the map as a contract. Be ready to change it based on feedback.
🔍 Deep Dive: The Walking Skeleton
The concept of the “Walking Skeleton” is central to this technique. It is the minimal set of features that allows you to deploy a working version of the system.
Imagine a skeleton. It has bones but no flesh. It is recognizable as a human. Similarly, a Walking Skeleton has the core structure but no extra features.
- Core Functionality: It must work end-to-end.
- Minimal Scope: It should be the smallest possible version.
- Testable: It must be deployable and testable immediately.
Building this first validates the architecture. It ensures the system can handle the flow before you add complexity. It reduces the risk of building a product that cannot be released.
🤝 Collaboration Techniques
Since mapping is collaborative, use techniques to ensure everyone participates.
- Dot Voting: Give each participant stickers. Let them vote on which stories are most important.
- Round Robin: Go around the room and ask everyone to add one story to the map.
- Silent Brainstorming: Let everyone write ideas silently before discussing them. This prevents dominance by loud voices.
- Role Playing: Act out the user journey. Walk through the map as the user would.
📈 Scaling the Map
As the product grows, the map can become large. How do you manage scale?
- Multiple Maps: Create separate maps for different user types (e.g., Admin vs. Customer).
- Modular Groups: Group activities into modules. Each module can have its own detailed map.
- Summary View: Create a high-level map that links to detailed maps. This keeps the overview clean.
🧭 Final Thoughts
User story mapping is more than a planning tool. It is a thinking tool. It forces teams to think about the user before the code. It shifts the focus from output to outcome. By visualizing the backlog, teams gain clarity and direction.
Start small. Pick one project and try to map it. Involve the team. Iterate on the process. Over time, the map becomes a vital artifact for the product. It guides decisions and keeps the team aligned. With practice, the art of mapping becomes second nature.
Remember, the goal is not to create a perfect document. The goal is to create a shared understanding. When everyone sees the same picture, the path forward becomes clear. This clarity leads to better products and happier users.

