


In the landscape of modern software development, the user story serves as the fundamental unit of work. It bridges the gap between business value and technical implementation. Understanding the user story lifecycle is critical for teams aiming to deliver consistent, high-quality software. This guide explores the journey from a raw concept to a deployed feature, ensuring clarity, efficiency, and alignment throughout the process.
Whether you are a product owner, developer, or tester, grasping these stages helps streamline workflows. A well-managed lifecycle reduces ambiguity, prevents scope creep, and ensures that the final product meets actual user needs. Let us dive into the mechanics of this workflow.
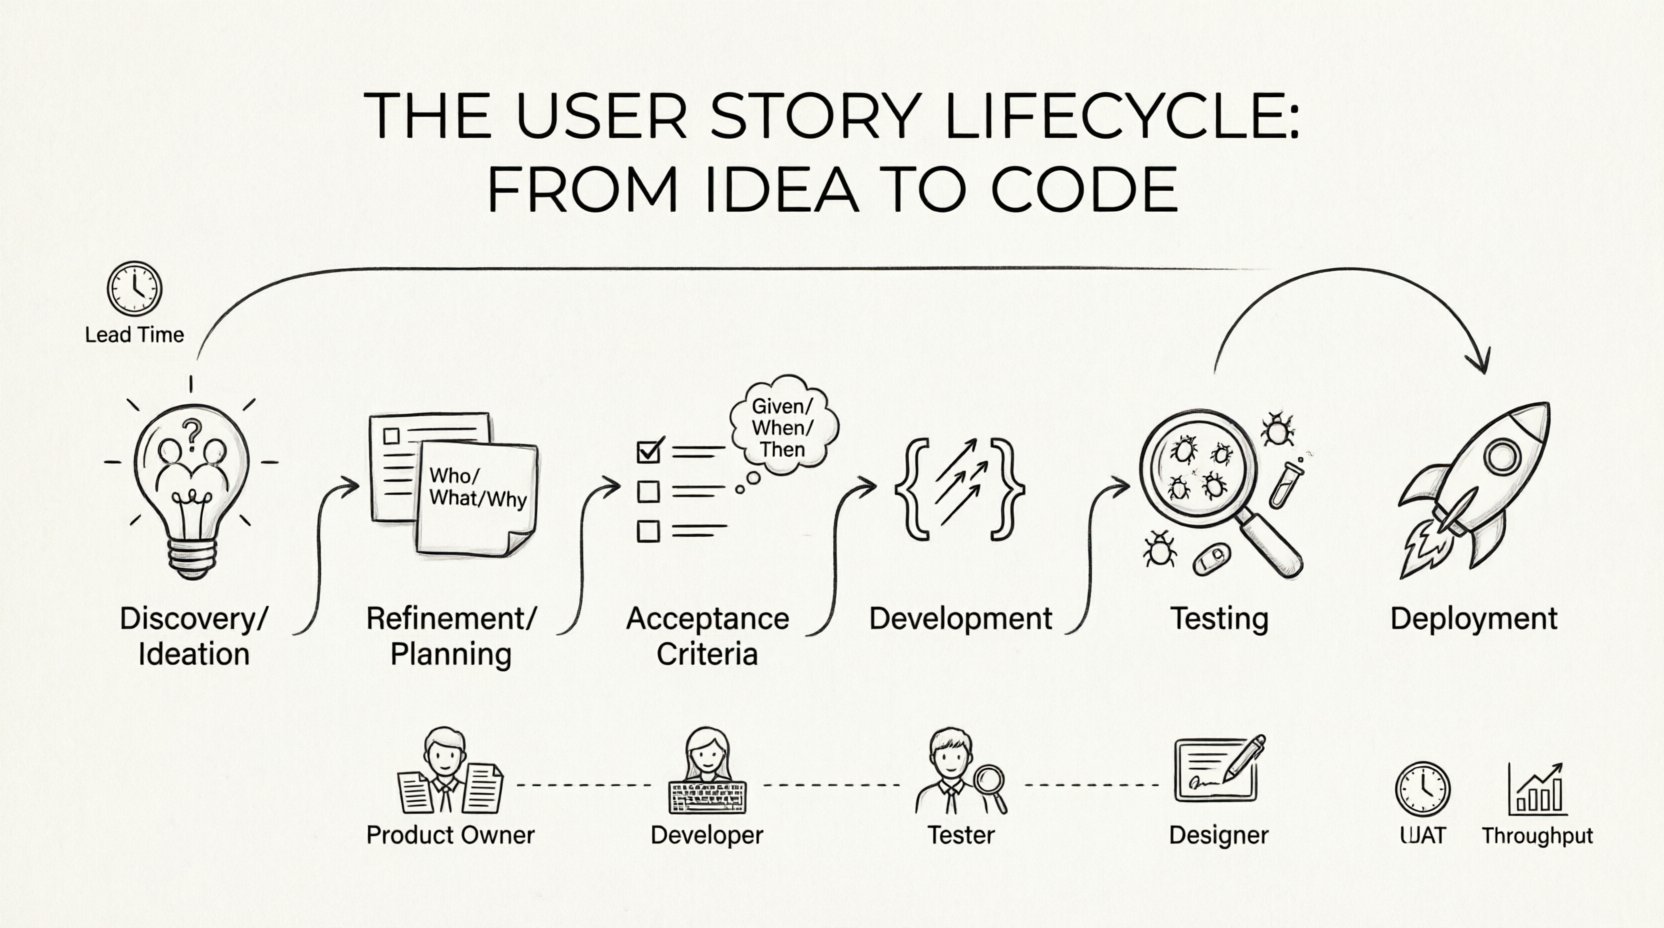
Phase 1: Discovery and Ideation 💡
The lifecycle begins with an idea. This stage is about identifying problems rather than prescribing solutions. It involves gathering insights from users, stakeholders, and market research. The goal is to capture the “why” before the “what”.
- Identifying the Problem: Is there a recurring pain point? Are users struggling with a specific task?
- Gathering Context: Who is experiencing this issue? What is their current workflow?
- Initial Validation: Is this problem worth solving? Does it align with strategic goals?
During this phase, ideas are often vague. They might appear as sticky notes, whiteboard sketches, or informal discussions. The objective is not perfection, but rather clarity of intent. A strong foundation here prevents wasted effort later.
Key Questions for Ideation
- Who is the primary beneficiary of this feature?
- What value does it bring to the business?
- How does it fit within the broader product vision?
Phase 2: Refinement and Planning 📝
Once an idea is identified, it moves into refinement. This stage transforms a raw thought into a structured user story. It requires collaboration between product management and the development team to ensure feasibility and alignment.
Structuring the Narrative
A standard user story follows a specific format to maintain consistency:
- Who: As a [type of user]…
- What: I want to [action]…
- Why: So that [benefit/value]…
This structure keeps the focus on user needs. It prevents the team from building features based on technical assumptions rather than user requirements.
Breaking Down Work
Large ideas often need to be split. A massive initiative can overwhelm the team and delay delivery. Breaking these into smaller, manageable stories allows for incremental progress.
- Vertical Slicing: Ensure each story delivers a complete piece of functionality, not just a technical layer.
- Estimation: Assign relative size or effort to each story to aid in planning.
- Dependency Mapping: Identify if one story relies on another to proceed.
Phase 3: Acceptance Criteria and Definition of Done ✅
Before development begins, the team must agree on what success looks like. This is defined through acceptance criteria and the Definition of Done (DoD). These are the quality gates that ensure the work meets expectations.
Acceptance Criteria Explained
Acceptance criteria are specific conditions that must be met for a story to be considered complete. They act as the contract between the product owner and the development team.
- Clarity: They should be unambiguous and testable.
- Completeness: They cover edge cases, not just happy paths.
- Format: Many teams use Gherkin syntax (Given/When/Then) for clarity.
Definition of Done
While acceptance criteria apply to specific stories, the Definition of Done applies to the entire project or sprint. It ensures consistency across all deliverables.
- Code has been reviewed.
- Tests have been written and passed.
- Documentation has been updated.
- No critical bugs remain.
Phase 4: Development and Implementation 🛠️
With criteria set and plans in place, the development phase begins. This is where code is written, and the abstract becomes concrete. The focus here is on maintaining quality while moving efficiently.
Best Practices for Coding
- Iterative Progress: Commit code frequently to integrate changes early.
- Code Reviews: Peer reviews catch errors and share knowledge.
- Adherence to Standards: Follow established coding conventions to ensure readability.
Communication remains vital during this phase. Developers should clarify ambiguities immediately rather than making assumptions. Regular check-ins with the product owner help ensure the implementation matches the intended value.
Managing Technical Debt
Pressure to deliver can lead to shortcuts. While sometimes necessary, shortcuts accumulate technical debt. Teams must balance speed with maintainability.
- Document any temporary solutions.
- Schedule refactoring tasks in future iterations.
- Never compromise security or data integrity for speed.
Phase 5: Testing and Verification 🧪
Testing is not a separate phase; it runs parallel to development. This stage validates that the solution works as intended and meets the acceptance criteria.
Types of Testing
- Unit Testing: Verifies individual components function correctly.
- Integration Testing: Checks how different parts of the system work together.
- User Acceptance Testing (UAT): Confirms the feature meets user needs.
Handling Defects
Bugs are inevitable. The process for handling them must be clear.
- Severity Levels: Categorize issues based on impact (Critical, High, Medium, Low).
- Reproduction: Ensure steps to reproduce are documented.
- Resolution: Fix the issue and retest to prevent regression.
Phase 6: Deployment and Feedback 🚢
Once verified, the story is ready for deployment. This involves moving code to the production environment. Post-deployment, the lifecycle does not end; it enters a feedback loop.
Release Strategies
- Blue-Green Deployment: Run two identical environments to switch traffic seamlessly.
- Canary Releases: Roll out to a small subset of users first.
- Feature Flags: Enable functionality remotely without redeploying code.
Measuring Success
How do we know the story delivered value? Metrics provide the answer.
- Adoption Rates: Are users using the new feature?
- Performance: Does the system handle the load?
- User Satisfaction: Gather qualitative feedback through surveys or interviews.
Common Pitfalls and Best Practices 📊
Even experienced teams encounter challenges. Understanding common pitfalls helps mitigate risks.
| Pitfall | Impact | Best Practice |
|---|---|---|
| Vague Requirements | Confusion, rework | Define clear acceptance criteria upfront |
| Scope Creep | Delays, budget overruns | Stick to the agreed story scope; add new items to backlog |
| Lack of Testing | Bugs in production | Integrate testing into the daily workflow |
| Ignoring Feedback | Low adoption | Monitor usage and gather user input post-release |
| Over-Splitting | Fragmented value | Ensure each story delivers independent value |
The Role of Collaboration 🤝
The user story lifecycle is not a relay race where one team passes the baton to the next. It is a continuous loop of collaboration. Cross-functional teams ensure that skills are shared and bottlenecks are removed.
- Product Owners: Define the “Why” and prioritize value.
- Developers: Define the “How” and implement solutions.
- Testers: Define “Quality” and validate functionality.
- Designers: Define the “Look and Feel” and user experience.
When these roles work in silos, the lifecycle suffers. Regular syncs, shared documentation, and mutual respect foster a culture of quality and speed.
Metrics That Matter 📈
To improve the lifecycle, teams need data. Several metrics provide insight into efficiency and quality.
- Lead Time: Time from idea to deployment.
- Cycle Time: Time from start of work to completion.
- Throughput: Number of stories completed per iteration.
- Defect Density: Number of bugs per story.
Tracking these helps identify bottlenecks. For example, if lead time is high, the refinement phase might be too slow. If defect density is high, the testing phase needs strengthening.
Continuous Improvement 🔄
The lifecycle is not static. It evolves as the team learns. Retrospectives after each iteration allow the team to reflect on what worked and what did not.
- Identify Improvements: What processes slowed us down?
- Experiment: Try new tools or techniques.
- Implement: Adopt changes that add value.
This mindset ensures that the workflow adapts to changing needs. It prevents stagnation and encourages innovation.
Conclusion on Workflow 🏁
Managing the user story lifecycle effectively requires discipline, communication, and a focus on value. By following a structured approach, teams can reduce waste and increase delivery speed. Remember that the goal is not just to write code, but to solve problems for users.
Every stage of the lifecycle contributes to the final outcome. From the initial spark of an idea to the feedback loop after deployment, each step matters. Consistency in these processes builds trust with stakeholders and creates a sustainable environment for engineering excellence.
Adopting these practices does not happen overnight. It requires commitment and patience. However, the long-term benefits include higher quality software, happier users, and a more efficient team. Start by refining one aspect of your current workflow and build from there.

